
S-Log to Rec.709: The “No-Stress” Guide to Perfect Color Conversion in DaVinci Resolve
If you just bought a Sony camera and loaded your first S-Log clip into DaVinci Resolve, you probably had the same reaction everyone does: “Why does this look gray, flat, and kind of… broken?”
Relax. Nothing’s wrong. S-Log is doing exactly what it’s supposed to do.
In this guide, we’re going to walk through exactly how to turn that flat, lifeless S-Log footage into clean, professional Rec.709 color; Without crushing your shadows, blowing highlights, or wrecking skin tones. We’ll do it step-by-step, with zero guesswork. We’ll focus on popular Sony bodies like the Sony A7S III and Sony FX3, but this workflow is the industry standard for all S-Log3 cameras.
Quick Summary: The 6-Step S-Log3 Conversion
Searching for the fast answer? Here is the "Professional Workflow" in seconds:
Import S-Log3 / S-Gamut3.Cine footage into a 10-bit Timeline.
Create a Node Tree with at least three nodes.
Apply the Color Space Transform (CST) effect to the last node.
Set Input Gamma to Sony S-Log3 and Input Gamut to Sony S-Gamut3.Cine.
Set Output Gamut/Gamma to Rec.709.
Adjust Exposure using the "Offset" wheel on the first node.
1. Why S-Log Looks “Bad” (And Why That’s a Good Thing)
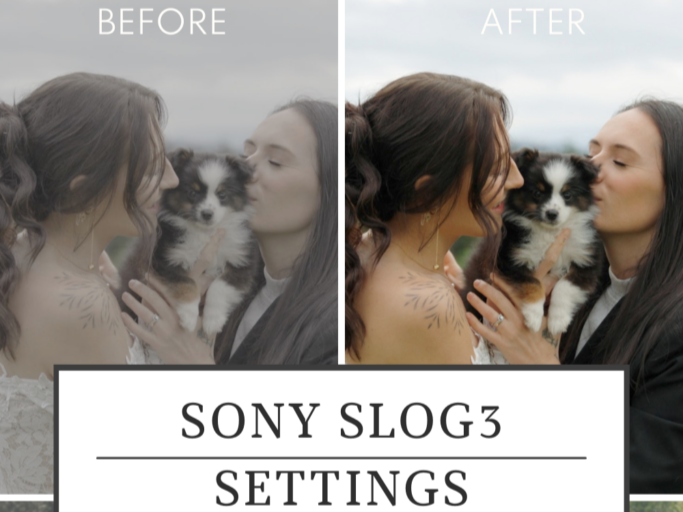
A side-by-side before and after comparison demonstrating Sony S-Log3 color conversion. The left images show ungraded, flat S-Log3 footage with low contrast and muted colors, while the right images display the corrected Rec.709 result with natural skin tones, accurate color reproduction, and balanced exposure. This visual illustrates proper S-Log3 exposure and color space conversion in DaVinci Resolve.
S-Log exists to capture maximum Dynamic Range. Instead of "baking" contrast and saturation into the file (which limits what you can do later), it stores as much highlight and shadow detail as possible in a "flat" format.
Think of S-Log like a digital negative:
No baked-in contrast.
No color punch.
Massive amounts of information.
Rec.709, on the other hand, is the delivery standard. It’s what TVs, phones, and the internet expect to see. Your job in post-production is to mathematically map that "information-heavy" S-Log file into the "viewable" Rec.709 space correctly.
Pro-Tip: If your S-Log footage looks “nice” straight out of the camera, check your settings. Proper S-Log should always look "milky" and gray before you touch it in Resolve.
2. Base ISO: The Foundation of Clean Color
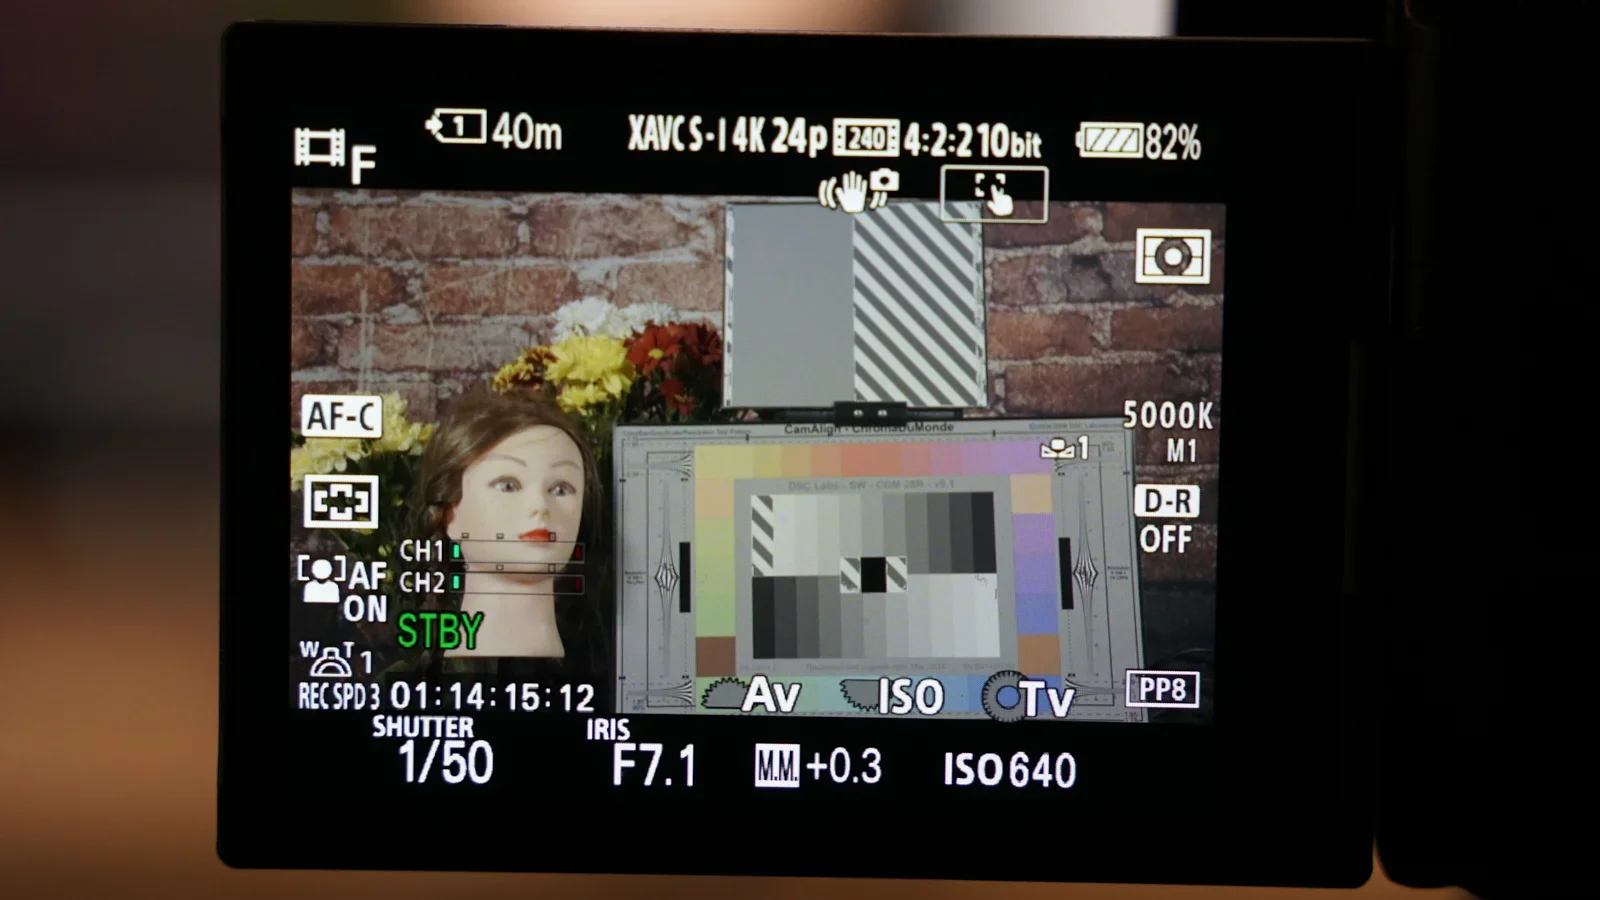
Close-up of a Sony camera monitor displaying S-Log3 shooting settings, including PP8 picture profile, base ISO 640, 10-bit 4:2:2 XAVC-S recording, and exposure tools. The screen shows a color chart and subject reference used to accurately expose S-Log3 footage for proper color conversion to Rec.709 in post-production.
Before Resolve even enters the picture, we need to talk about Base ISO. Sony cameras like the A7S III and FX3 use a "Dual Base ISO" for S-Log3 (typically ISO 640 and ISO 12,800).
Shooting at these specific points ensures:
The cleanest possible shadows.
Maximum sensor performance.
Minimal digital noise.
If you stray too far from these bases without proper lighting, you introduce "muddy" shadows that even the best color grade can't fix.
3. The Golden Rule: Over-Exposing S-Log by 1.7–2 Stops
This is the step beginners miss, and it’s the #1 reason for "noisy" Sony footage. S-Log3 is designed to be "exposed to the right" (ETTR).
Why? Sony allocates more data to the highlights than the shadows. By over-exposing your image by +1.7 to +2.0 stops, you push the shadow detail into a cleaner part of the data stream.
Use your tools: Don't trust the LCD screen. Use False Color or Zebras.
Skin Tones: Caucasian skin tones should typically sit around 60–70 IRE on your waveform when shooting S-Log3.
Pro-Tip: You aren't "blowing out" the image. You are capturing a "thick" negative that you will "bring down" during the conversion process for a silkier, noise-free look.
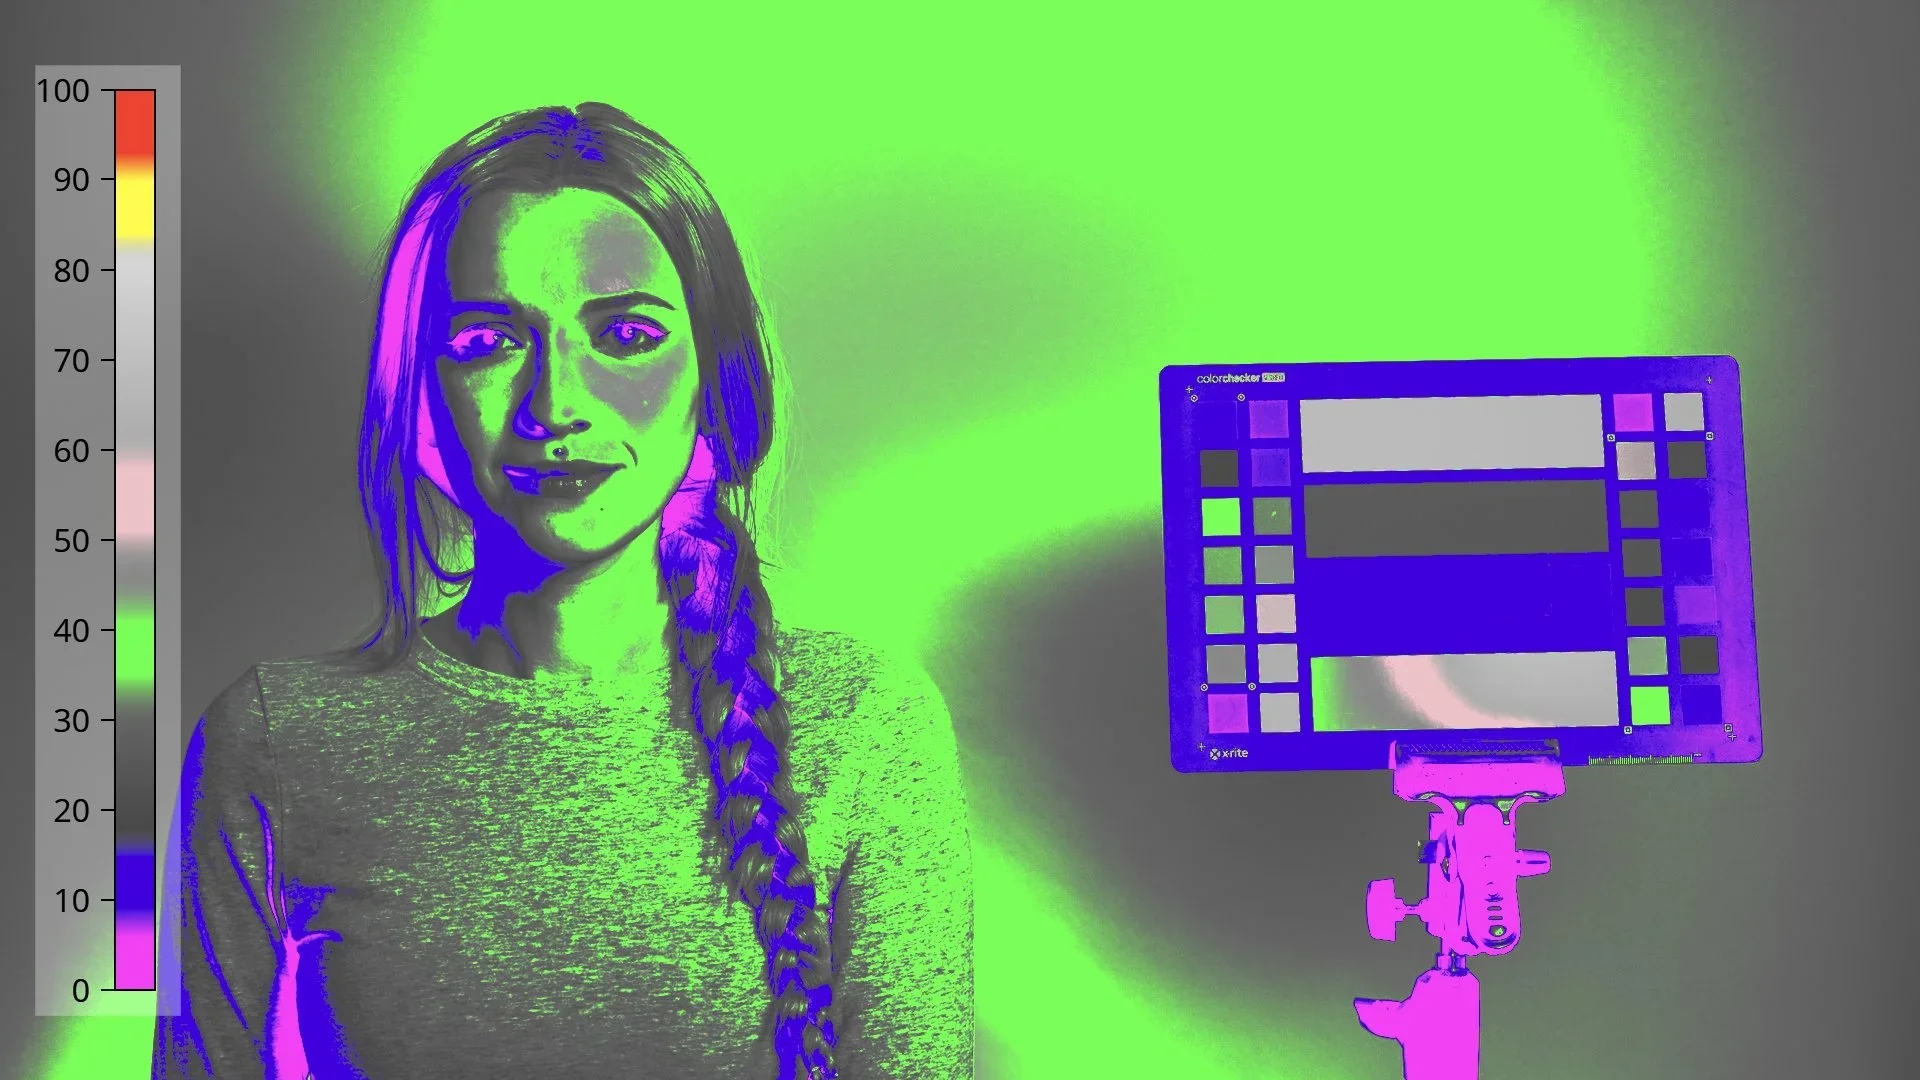
False color exposure overlay applied to Sony S-Log3 footage, illustrating underexposed skin tones and exposure distribution across the frame. The image includes a subject and color chart reference, demonstrating how false color tools help filmmakers properly expose S-Log3 to preserve dynamic range and avoid shadow noise before Rec.709 conversion.
4. Gamut & Gamma: The Two Pieces of Color Science
To convert footage correctly, you must treat Gamma and Gamut as two separate things:
Gamma: How brightness and contrast are encoded (e.g., S-Log3).
Gamut: The actual "bucket" of colors the camera can see (e.g., S-Gamut3.Cine).
If you mix these up (for example, telling Resolve you shot in S-Log2 when you actually shot S-Log3), your skin tones will look "sickly" or "plastic." This is why a Color Space Transform is safer than a random LUT you found online.
5. Technical LUT vs. Creative LUT (Know the Difference)
Beginners often make the mistake of using "Creative LUTs" (the ones that give you a 'Film Look') as their conversion tool.
Technical LUT: A mathematical bridge that turns S-Log3 into Rec.709. It has no "style"—it just makes the image look "normal."
Creative LUT: A stylistic choice that adds mood, teal/orange tints, or film grain. It assumes your footage is already converted to Rec.709.
Never apply a Creative LUT directly to S-Log footage. You will crush your data and lose all the benefits of shooting S-Log in the first place.
6. The Ultimate DaVinci Resolve Node Tree (Step-by-Step)
In DaVinci Resolve, the "Node Tree" is your assembly line. For a beginner-proof workflow, use this three-node setup:
Node 1: Exposure & Balance (The "Input" Node)
Before the conversion happens, you want to "normalize" your exposure. Use the Offset Wheel (the far right wheel in the Primary tab) to bring your over-exposed footage down until it looks natural.
Node 2: The Color Space Transform (CST)
This is the most important node. Search for "Color Space Transform" in the OpenFX library and apply it here.
Input Color Space: Sony S-Gamut3.Cine
Input Gamma: Sony S-Log3
Output Color Space: Rec.709
Output Gamma: Rec.709 (or Gamma 2.4)
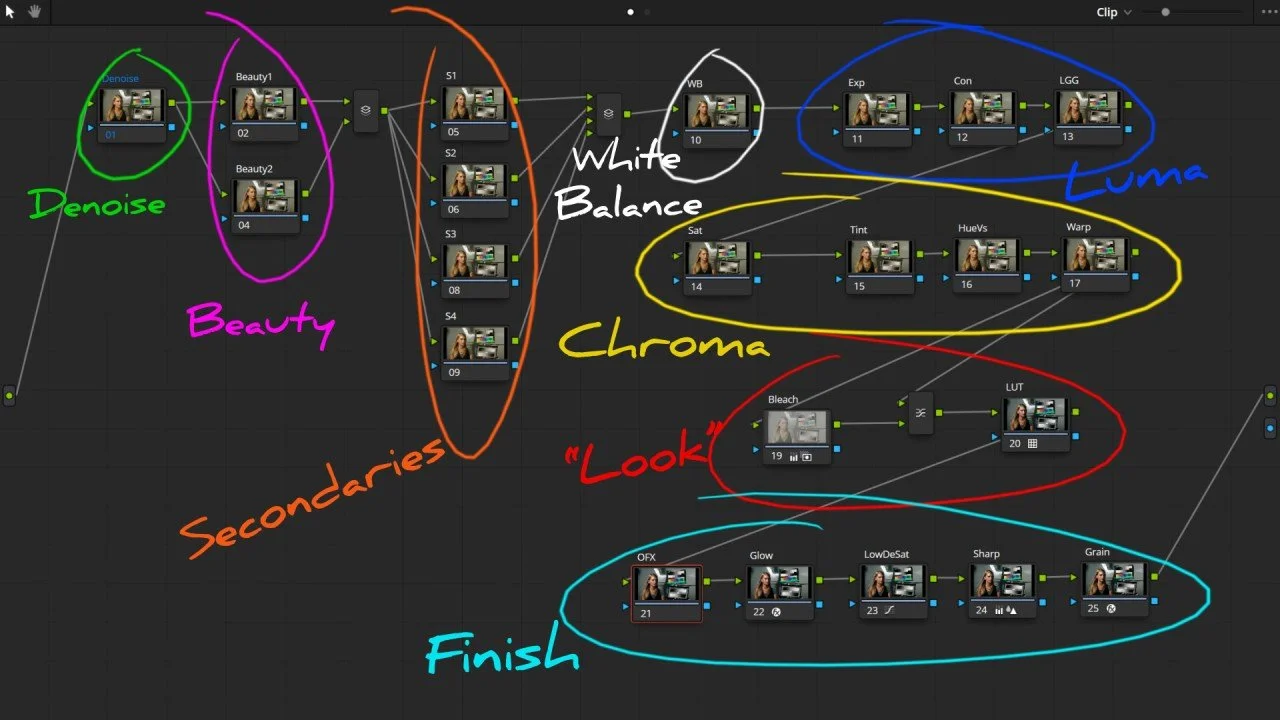
Screenshot of a structured DaVinci Resolve node tree illustrating a full professional color grading workflow for Sony S-Log3 footage. The node graph is organized into labeled sections including denoise, beauty adjustments, secondary color corrections, white balance, luma and chroma control, creative look development, and final finishing effects such as glow, sharpening, and film grain. This image demonstrates best practices for building a clean, scalable node tree before converting S-Log3 to Rec.709.
Node 3: Creative Look
This is where you add your "sauce." Adjust your saturation, add a bit of contrast, or apply that "Film Emulation" LUT you love.
Pro-Tip: Always place your CST (conversion) at the end of your basic correction chain. This allows you to "feed" the math clean, balanced data.
7. 10-Bit vs. 8-Bit: A Serious Warning
If you are using a modern Sony A7S III, FX3, or A7IV, you are likely shooting 10-bit 4:2:2. This is perfect for S-Log because it has enough color data to handle heavy stretching.
However, if you are on an older camera (like the a7S II or a6400) shooting 8-bit, S-Log can be dangerous. 8-bit files often "break" when you try to convert them, leading to banding in the sky or "splotchy" skin tones.
If you shoot 8-bit: Be extremely precise with your exposure.
If you see banding: You've pushed the file too far. Back off the contrast!
8. FAQ: People Also Ask
Should I use S-Log2 or S-Log3?
For most modern Sony cameras (A7S III/FX3), S-Log3 is the standard. It offers more dynamic range and is easier to match with professional cinema cameras like the Sony VENICE.
Why is my S-Log footage grainy?
Noise in S-Log usually comes from under-exposure. If you expose S-Log "normally" (at 0 on the light meter), your shadows will likely be noisy. Remember to over-expose by +1.7 to +2.0 stops!
Is a CST better than a Sony LUT?
Both work, but a Color Space Transform (CST) is generally better because it is "non-destructive" and allows you to adjust the "Tone Mapping" to fit your specific clip perfectly.
Final Thoughts
Mastering the S-Log to Rec.709 workflow isn't about having "good eyes"—it's about respecting the math of your camera's sensor. Once you get the technical conversion right in DaVinci Resolve, the "creative" part becomes much easier.
Next Step: Take a clip you shot today, apply a CST, and use the Offset wheel to find that perfect exposure. You'll be amazed at how quickly your "gray" footage turns into a masterpiece.